Categories
reference

Chroma Subsampling / 4:4:4 vs 4:2:2 vs 4:2:0

Color Subsampling is a compression method that reduces the resolution of color data while retaining the brightness (luminance) data at full resolution.

It is widely used in video compression to reduce data size with minimal visual loss, as the human eye is more sensitive to brightness than color.

Types of Chroma Subsampling

4:4:4 – No Subsampling

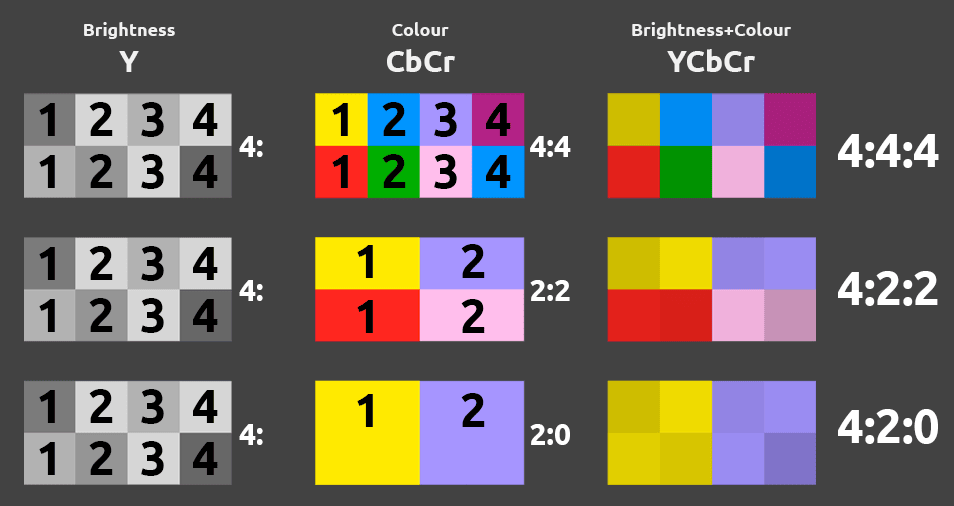
  • In this format, both brightness (Y) and color channels (Cb and Cr) maintain full resolution, meaning each pixel has individual color and brightness data.
  • This format offers the highest quality and is commonly used in professional editing and color correction.

4:2:2 – Horizontal Half Subsampling

  • Here, color channels (Cb and Cr) are sampled at half the horizontal resolution, while brightness remains at full resolution.
  • Commonly used for broadcasting and professional video as it provides high quality with moderate data reduction.

4:2:0 – Horizontal and Vertical Half Subsampling

  • Color resolution is reduced both horizontally and vertically while brightness remains at full resolution.
  • Widely used in consumer video formats such as Blu-ray and streaming, as it achieves significant data compression while preserving acceptable visual quality.

There is one more format: 4:1:1
It’s rarely used today but was once found in some professional formats like NTSC DV.


Naming

In chroma subsampling notation, such as 4:4:4, 4:2:2, and 4:2:0, each number represents how brightness and color data are recorded:

  • The first digit is always “4” and indicates the sampling rate of luminance (brightness) horizontally, covering each pixel.
  • The second digit shows the horizontal sampling of chrominance (color).
  • The third digit indicates the vertical sampling of chrominance.

This subsampling reduces data size because human eyes are more sensitive to brightness than color, allowing for efficient compression without noticeable quality loss.


Comparison of formats

Format
Brightness
(Y)
Color
(Cb and Cr)
Use Cases
4:4:4FullFullHigh-quality editing and color correction
4:2:2FullHalf horizontalBroadcast and professional video
4:2:0FullHalf horizontal and verticalConsumer video, Blu-ray, streaming

Each format caters to different needs, balancing quality and data efficiency based on the requirements of the specific video application.
Categories
issues

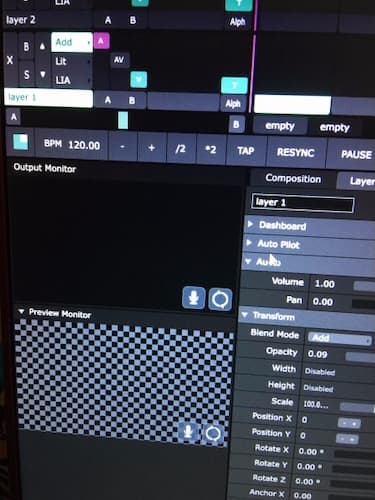
Unclear Icons with round arrows and a mic in the corner of the Resolume preview

If you find obscure round arrow icons or a microphone icon in the bottom right corner and don’t understand where they came from, it’s easy to solve the problem.


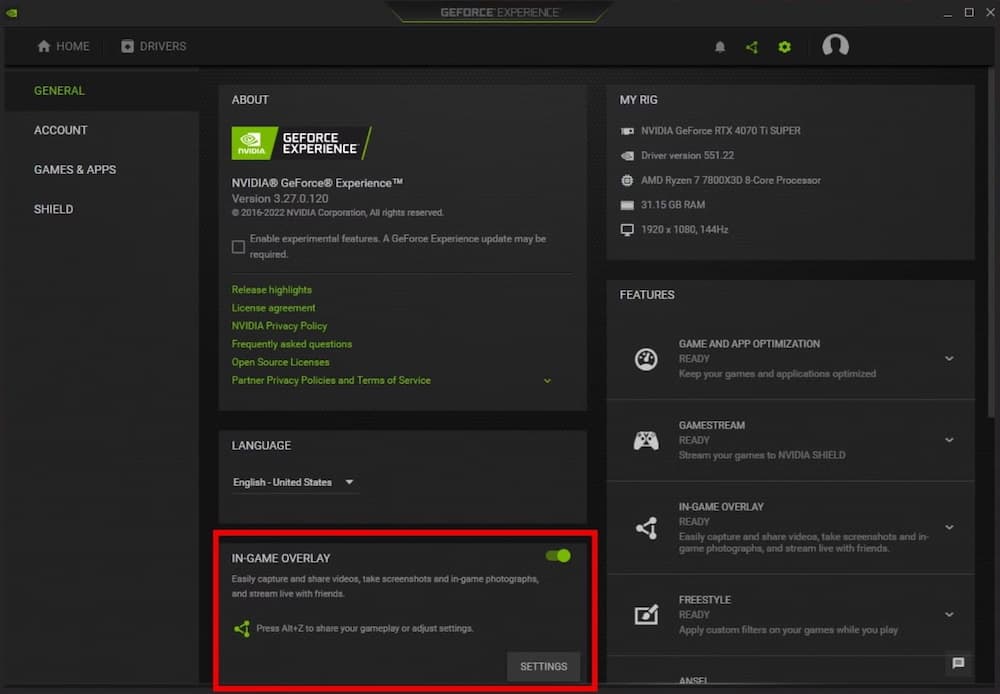
The reason for this is the Nvidia geforce panel overlay.

You need to disable overlay mode in GeForce experience settings

Keep your media server clean, do not use any software that may interfere with your computer under load.
Cheers.

Categories
calculators

Determine the HEIGHT for 16×9 / 4×3

cm.
Height for 16 x 9
cm.
Height for 4 x 3
cm.
Categories
calculators

Determine the WIDTH for 16×9 / 4×3

cm.
Width for 16 x 9
cm.
Width for 4 x 3
cm.
Categories
calculators

Lens coefficient calculator

cm.
cm.
Coefficient:

Categories
guides

USB, How to tell the difference

The Story of How Poor Naming Led to Confusion and Profits for Clever Marketers

USB-IF, the organization responsible for overseeing USB specifications and ensuring compliance, released the USB 3.1 standard and the Type-C form factor in 2013, sparking a lot of debate and misunderstandings. When they introduced the 3.2 generation in 2017, they decided to fix things by renaming all previous generations to 3.2, which only caused more chaos.

Let’s break it down!

We won’t touch on the older generations, although USB 2.0 is still used in budget devices. Let’s note that its speed was 480 Mbps.

USB 3.0
In 2008, USB 3.0 was introduced, significantly outpacing its predecessor with a new data transfer speed that increased more than tenfold, from 480 Mbps to 5 Gbps.

USB 3.1
In 2013, a new Type-C connector was introduced to address the issues with the outdated Type-A connector. The new connector was now reversible, and the new 3.1 standard doubled the speed to 10 Gbps.

At this point, the USB-IF organization decided to rename the standards:

  • USB 3.0 became USB 3.1 Gen 1
  • USB 3.1 became USB 3.1 Gen 2

However, the new protocol didn’t gain popularity quickly, and many manufacturers sold their products with Type-C, labeling it as 3.1. But we understand that, in reality, it’s 3.0. When customers saw Type-C, they assumed it was the new standard and eagerly bought the products. Marketers were thrilled!

Meanwhile, Intel, in collaboration with Apple, was developing its interface, Thunderbolt. In 2015, it reached its third generation, abandoned its own connector, and moved to Type-C. Externally, you can only distinguish it by the lightning symbol next to the port. The interface itself is very powerful, with an enormous speed of 40 Gbps, four times faster than USB 3.1.

USB 3.2
Then, in 2017, our beloved USB-IF organization released a new generation—USB 3.2—with a speed of 20 Gbps, still twice as slow as Thunderbolt 3, which had come out two years earlier. And what did they decide to do? Of course, rename everything again!

Now, pay attention:

  • USB-A 3.0 is now USB 3.2 Gen 1×1
  • USB-C 3.0 is now USB 3.2 Gen 1×1 and USB 3.2 Gen 1×2
  • USB-A 3.1 is now USB 3.2 Gen 2×1
  • USB-C 3.1 is now USB 3.2 Gen 2×1
  • USB-C 3.1 is now USB 3.2 Gen 2×2

Confusing, right?

Now imagine the joy of the marketing department when they can now legally print “USB 3.2” on the packaging of the most basic USB-A 3.0 flash drives!
And people will buy them! Of course, the generation will be indicated in small print on the back of the packaging.

The most interesting part is that the USB-IF organization was well aware of the mess they created and the chaos that ensued.

Later, they decided to bring order to the naming conventions and move away from the familiar numerical designations.

Now, manufacturers need to specify the interface speed:

  • SuperSpeed USB 5Gbps
  • SuperSpeed USB 10Gbps
  • SuperSpeed USB 20Gbps

USB 4.0
In 2019, they introduced a generation they could be proud of—USB4 (yes, spelled as one word, without a hyphen). The new generation was based on Thunderbolt 3, which increased the speed to 40 Gbps and allowed for backward compatibility. USB4 only uses the Type-C connector; they decided to finally abandon Type-A.

In 2022, USB4 2.0 was introduced, with a bandwidth of up to 80 Gbps.


Curent marketing nameCuren tech nameName in 2017Name in
2013
Name in
2008
BandwithConnector options
SuperSpeed USB 5GbpsUSB 3.2 Gen 1×1USB 3.2 Gen 1×1USB 3.1 Gen 1USB 3.05GbpsUSB-A,
USB-B,
USB-C
USB 3.2 Gen 1×2USB 3.2 Gen 1×210GbpsUSB-C
SuperSpeed USB 10GbpsUSB 3.2 Gen 2×1USB 3.2 Gen 2×1USB 3.1 Gen 210GbpsUSB-A,
USB-C
SuperSpeed USB 20GbpsUSB 3.2 Gen 2×2USB 3.2 Gen 2×220GbpsUSB-A,
USB-C
USB4 2×110GbpsUSB-C
USB4 20GbpsUSB4 2×220GbpsUSB-C
USB4 3×120GbpsUSB-C
USB4 40GbpsUSB4 3×240GbpsUSB-C
USB4 80GbpsUSB4 Gen 480GbpsUSB-C

Table is scrollable

Categories
issues

Problems with NDI

It happens that NDI does not work due to different versions included with the software.

You can fix this by installing the latest version of NDI Tools and copying the latest DLL libraries from there:
At the address:
..\Program Files\NewTek\NDI 4 Tools\Runtime\

Processing.NDI.Lib.x64.dll (for 64-bit systems)

Processing.NDI.Lib.x86.dll (for 32-bit systems)

Paths of popular programs where to copy fresh DLLs:
..\Program Files\Resolume Arena\
..\Program Files\Derivative\Touch Designer\bin\
..\Program Files (x86)\vMix\ndi\x64\ 
..\Program Files (x86)\vMix\ndi\x86\

Categories
issues

Frame drop issues in resolume (No smooth picture)

Here’s the checklist to start with:
  1. Which video output is the control monitor connected to?
    It should be connected to your dedicated graphics card.
  2. Which graphics card is rendering?
    It should be your main dedicated graphics card.
    You can check this under: Output -> Show Display Info, the details will appear in the top left corner of the screen.
  3. What is the video codec of the clip (e.g., mov dxv3 @25)?
    It is highly recommended to use the native DXV3 codec.
    Technically, you can use H.264, MJPEG, HAP, ProRes, but stable performance is only guaranteed with DXV3.
  4. What is the frame rate of the video clip (frames per second)?
    Refer to the last point.
  5. What FPS is set in the project settings?
    Refer to the last point.
  6. What is the signal format being received (if a capture card is used)?
    Refer to the last point.
  7. What frequency is set on the video card outputs (e.g., 50Hz)?
    Refer to the last point.
  8. What frequency is set on the control monitor (e.g., 50Hz)?

From points 4 to 8, all frequencies and frame rates should be divisible by a common denominator!

  • Frame rate of the video clip.
  • Frame rate in the project settings.
  • Frequency of the input signal on the capture card.
  • Frequency on the video card outputs (monitors/displays/processors/sending cards).
  • Frequency on the control monitor.

All these points are crucial!

EXAMPLE:
If you are using cameras that operate at 1080p @50, then all the points listed above should be divisible by 50Hz. Monitors should be set to 50Hz, content should be at 50 and 25 fps accordingly.

Categories
issues

Disabling Aero Peek

If you find yourself in situations where you accidentally hover your mouse over a minimized window icon on the Windows taskbar, and suddenly the screen briefly displays a browser window or an open folder instead of your footage from Resolume, it’s likely that Aero Peek is enabled.

This beautiful feature, aimed at enhancing the convenience of working with Windows, becomes a major issue in our field, causing significant frustration for video engineers, VJs, and directors.

Disabling Aero Peek via System Properties
  • Go to System in your system Control Panel and press the Advanced System Settings
    Or you can use the shortcut:
    Press the Windows + R keyboard shortcut to open the Run dialog, then type sysdm.cpl and hit Enter.
  • On the System Properties dialog box, select the Advanced tab. Click the Settings button under the Performance section.
  • Select the Visual Effects tab, look for the option entitled “Enable Aero Peek” or “Enable Peek“, which allows you to turn the Aero Peek feature on or off.
  • Click Apply
Categories
tips

Screen size options for 16×9 / 4×3 aspect ratios

When choosing a screen size, see how close your size is to the ideal 16×9 or 4×3.

BEST GOOD NOT BAD BAD
< 0,04 0,04-0,08 0,09-0,13 > 0,13
16×9 (1,77) 4:3 (1,33)
Width High 1,77 Width High 1,33
2,5 1,5 1,67 2,5 2 1,25
3 2 1,50 3 2,5 1,20
3,5 2 1,75 3,5 2,5 1,40
4 2,5 1,60 4 3 1,33
4,5 2,5 1,80 4,5 3,5 1,29
5 3 1,67 5 4 1,25
5,5 3 1,83 5,5 4 1,38
6 3,5 1,71 6 4,5 1,33
6,5 3,5 1,86 6,5 5 1,30
7 4 1,75 7 5 1,40
7,5 4 1,88 7,5 5,5 1,36
7,5 4,5 1,67 7,5 6 1,25
8 4,5 1,78 8 6 1,33
8,5 5 1,70 8,5 6,5 1,31
9 5 1,80 9 7 1,29
9,5 5,5 1,73 9,5 7 1,36
10 5,5 1,82 10 7,5 1,33
10,5 6 1,75 10,5 8 1,31
11 6 1,83 11 8,5 1,29
11,5 6,5 1,77 11,5 9 1,28
12 7 1,71 12 9 1,33
12,5 7 1,79 12,5 9,5 1,32
13 7,5 1,73 13 10 1,30
13,5 7,5 1,80 13,5 10 1,35
14 8 1,75 14 10,5 1,33
Handbook
Calculators
Guides
Download
Search